In today’s web development landscape, React.js reigns supreme as a popular JavaScript framework. While services like Vercel offer streamlined hosting with version control integration, self-hosting presents a compelling alternative. If you have a Synology NAS with 8GB or more RAM running DSM 7.2, you can leverage Docker to host your React.js application, giving you greater control and customization.
This guide walks you through the process of self-hosting your React.js app on your Synology NAS:
Prerequisites:
- Synology NAS with DSM 7.2 or later
- Minimum 8GB RAM recommended
- Basic understanding of Docker and React.js development
Step-by-Step Guide:
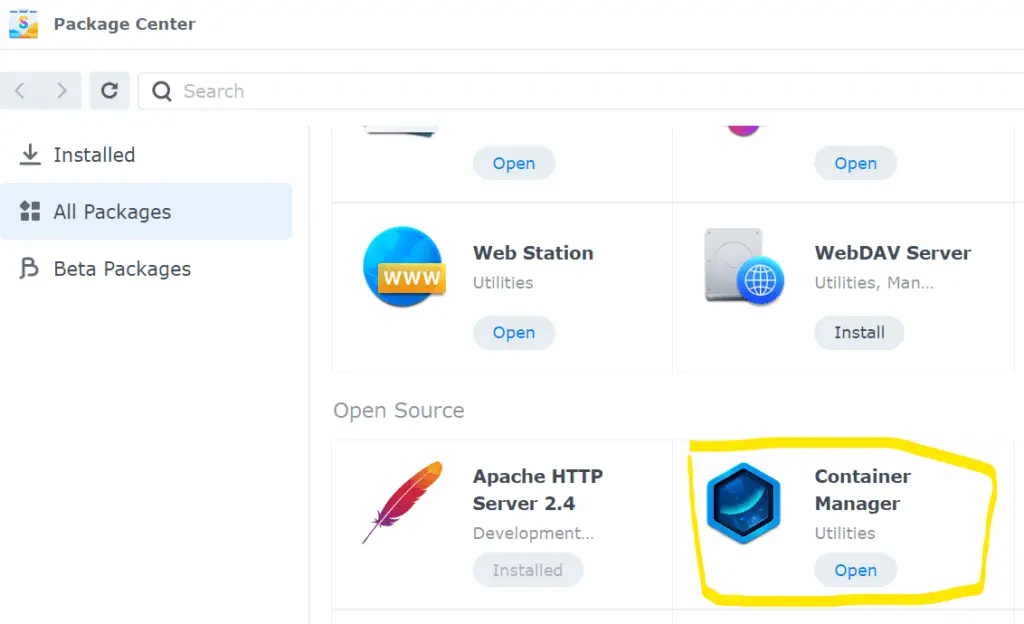
- Install and Run Container Manager:
- Access your NAS’s Package Center.
- Search for and install “Container Manager.”
- Launch the Container Manager application.
- Download the Node.js Docker Image:
- In the Container Manager interface, navigate to the “Registry” tab on the left panel.
- Search for “node” and choose the official Node.js image.
- Download the desired Node.js version that aligns with your project’s requirements.

- Run the Node.js Container:
- Once downloaded, switch to the “Image” tab.
- Locate the downloaded Node.js image and click “Run.”
- Configure Container Settings:
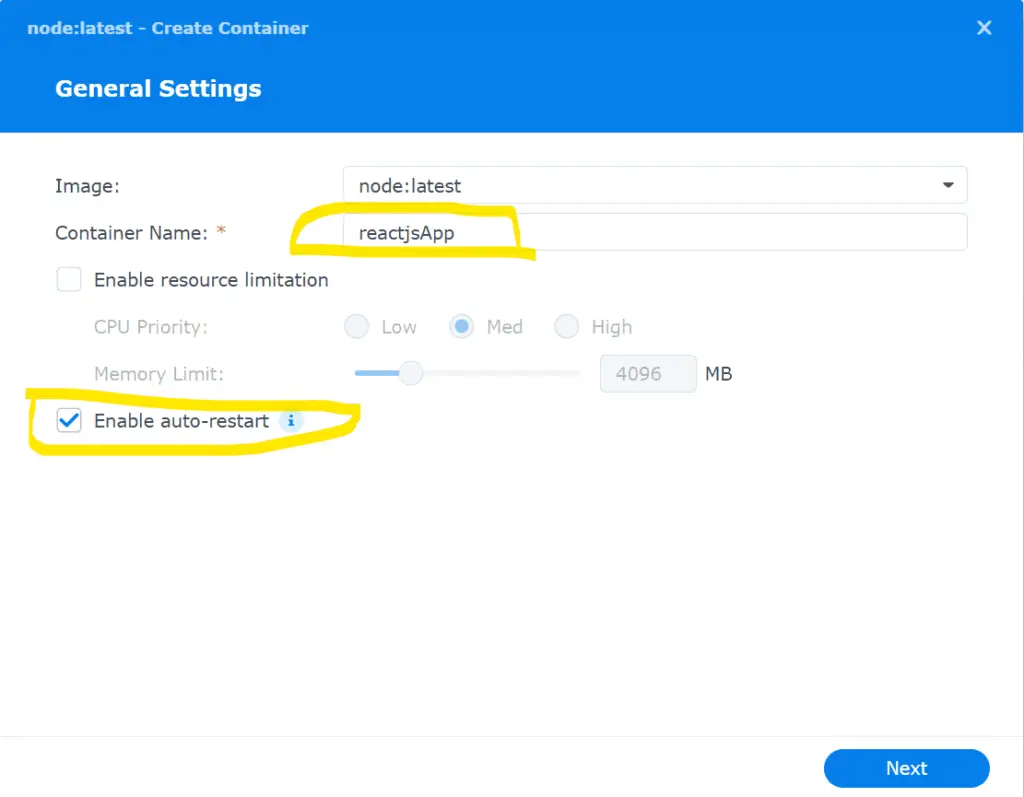
- Enable Auto-Restart: Ensure your React.js application restarts automatically in case of crashes by ticking the “Enable auto-restart” option.
- Assign a Meaningful Name: Give your container a descriptive name for easy identification.
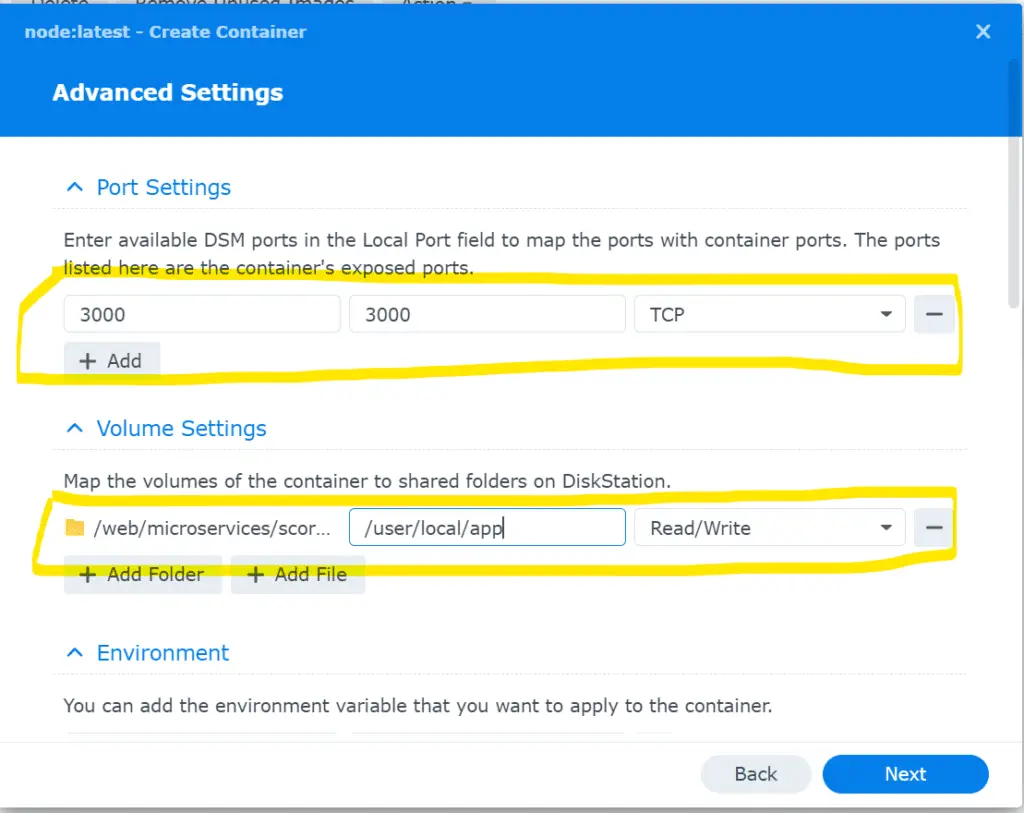
- Port Mapping: Map port 3000 inside the container to port 3000 on your NAS. This allows external access to your application.
- Volume Settings: Mount your React.js application’s root folder on your NAS to “/usr/local/app” within the container. This makes the application code accessible within the container environment.
- Execution Command: Set the command to simply “node” (without quotes) to execute the Node.js runtime within the container.
- Finalize and Run:
- Review all configured settings to ensure accuracy.
- Click “Done” and choose “Run this container after the wizard is finished.” The process might take a few minutes depending on your NAS model and internet speed.
- Access the Container Terminal:
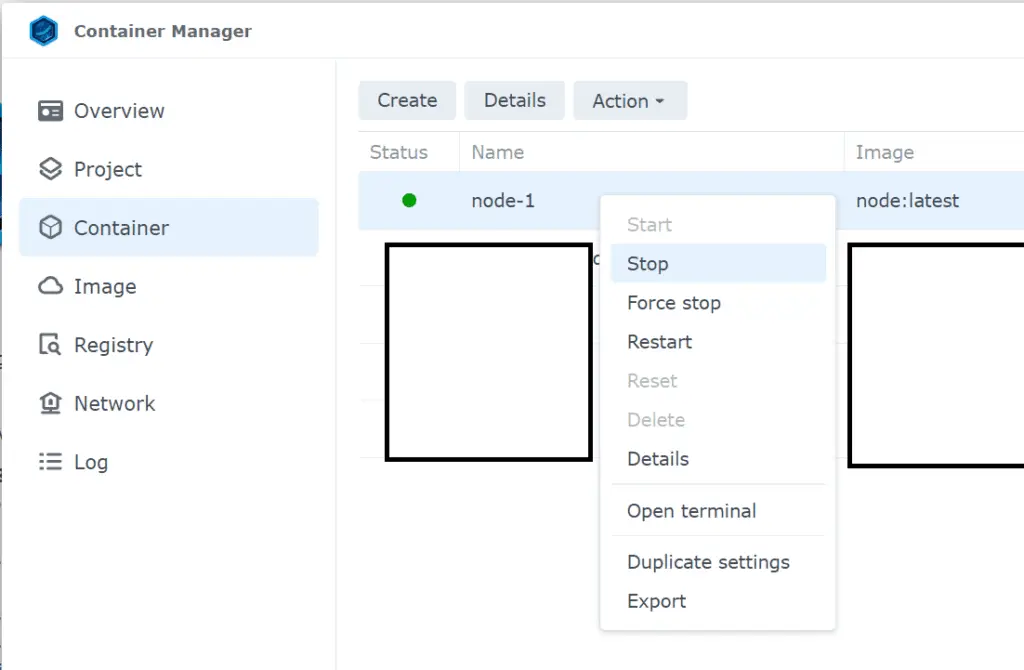
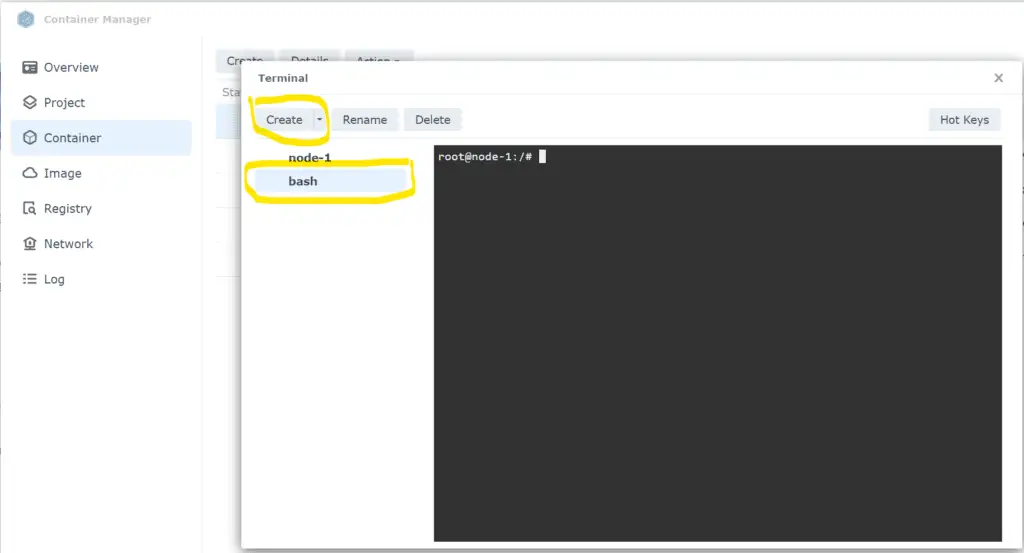
- Once the container is running, right-click on it and select “Open terminal.”
- Within the terminal, create a new Bash session using the “Create” -> “bash” option.
- Prepare the Application Environment:
- Inside the terminal, execute the following command:
apt update && apt install nanoAfter nano been installed, navigate to docker-entrypoint.sh file. This file executes all commands in it after operating system is loaded. Location of the file is in “/usr/local/bin/docker-entrypoint.sh” edit with nano, and add after set -e at the top:
cd /usr/local/app npm cache clean --force npm install npm run build && npm run start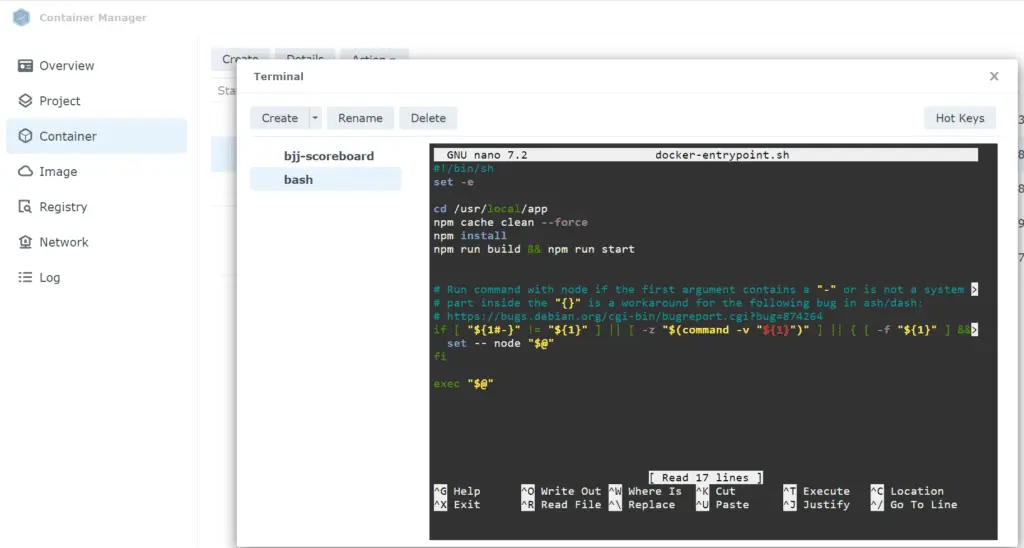
- Explanation:
- apt update && apt install nano: Updates package lists and installs the nano text editor for editing files.
- npm cache clean –force: Clears the Node.js package cache, ensuring the latest dependencies are downloaded.
- npm install: Downloads and installs all required dependencies for your React.js application.
- npm run build && npm run start: Builds an optimized production version of your application and then starts the development server.
- Save Changes:
- To save changes to docker-entrypoint.sh use Ctrl + x, then y, followed by Enter to save changes.
- Verify Application Status:
- Check the container logs or use curl localhost:3000 in the terminal of the container to see a response if the application is running successfully.
Congratulations! You’ve successfully self-hosted your React.js / Next.js application on your Synology NAS.
Additional Considerations:
- HTTPS: For a secure web experience, consider setting up a reverse proxy like Nginx on your NAS to handle SSL/TLS certificates and route traffic to your React.js application container.
- Persistence: If your application relies on persistent data storage, explore options like Docker volumes or dedicated storage solutions on your NAS.
- Process Management: For a production environment, use a process manager like PM2 to ensure automatic application restarts in case of crashes.
Making Your React.js Application Publicly Accessible:
This guide focused on self-hosting your React.js application on your Synology NAS within your local network. To make it accessible from the internet, here’s a breakdown of the necessary steps:
Prerequisites:
- A registered domain name (e.g., from a domain registrar)
- Access to your router’s configuration interface
Steps:
- Obtain a Domain Name:
- Purchase a domain name that will serve as your application’s public address on the internet. There are many domain registrars to choose from, offering varying prices and features. You can purchase a domain from one of our affiliated hosting companies
- Configure Port Forwarding:
- Access your router’s configuration interface (usually through a web browser).
- Set up a port forwarding rule to direct all incoming traffic on port 443 (HTTPS) to your NAS’s internal IP address and port (typically 3000 for the React.js application).
- Set Up a Reverse Proxy with SSL/TLS (traditional):
- Install a reverse proxy like Nginx on your NAS.
- Configure the reverse proxy to:
- Use HTTPS with a valid SSL/TLS certificate (consider using Let’s Encrypt for free certificates).
- Route incoming traffic on port 443 to your React.js application container running on port 3000.
- Set Up a Reverse Proxy with SSL/TLS (DSM Built-in Reverse Proxy):
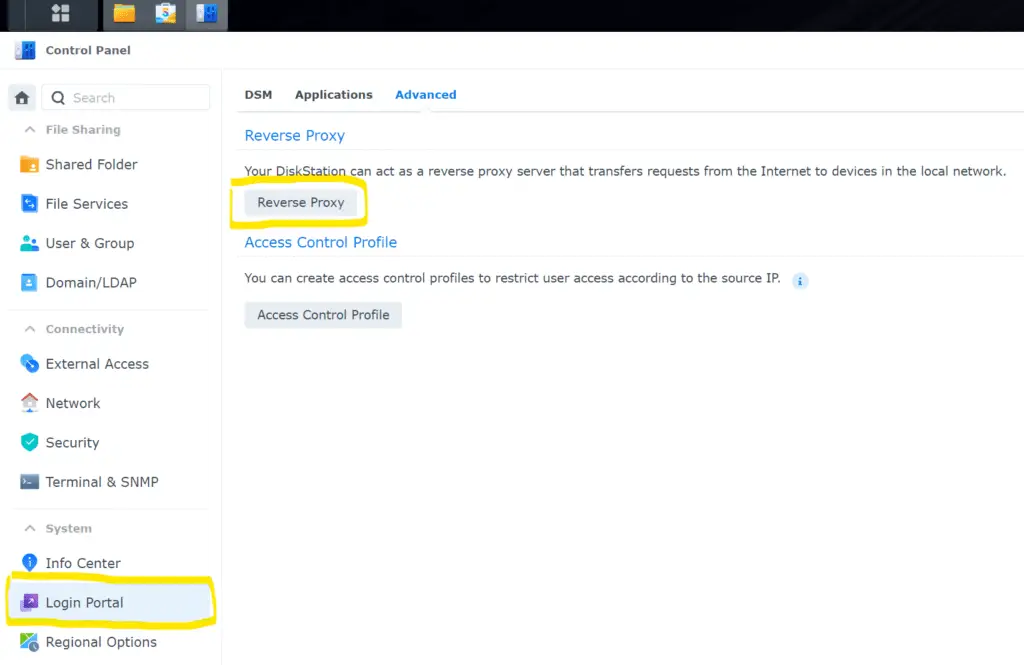
- Go back to your Synology NAS desktop, then open the Control Panel, navigate to “Login Portal” -> “Advanced” then click on “Reverse Proxy”
- Click “Create” to open a new dialogue, give it a meaningful name. in the “Source” section change protocol to https, in the hostname add your new domain name or subdomain name, in the port add 443 which is the standard port for https communications. Enable HSTS. In the “Destination” section, keep protocol at http, hostname: localhost, port:3000. Then click on “Save”.
- To create a valid certificate using Let’s Encrypt for free:
- In the Control Panel, navigate to “Security” -> then click on “Certificate”
- Click “Add” , leave “Add a new certificate” and then click “Next”. Click on “Get a certificate from Let’s Encrypt” then click “Next”

- Enter your new domain/sub-domain in the Domain name input, and select an email address to be used for this certificate, in the subject alternative name you can add www. To the domain name. Click “Done”. This might take a couple of minutes.
- Verify Public Accessibility:
- Use a tool like portchecker.co to confirm that port 443 is open on your NAS’s public IP address.
- Access your application using your registered domain name in your web browser (e.g., https://yourdomain.com).
Important Security Considerations:
- Opening ports to the internet: Exposing ports on your NAS increases your attack surface. Ensure you have a strong firewall in place to protect against unauthorized access.
- SSL/TLS Certificates: Implement HTTPS with a valid SSL/TLS certificate to encrypt communication between your application and users, safeguarding sensitive data.
- Regular Updates: Keep your NAS software, Docker, Node.js, and your React.js application updated with the latest security patches to minimize vulnerabilities.
By following these steps, you’ve successfully self-hosted your React.js application on your Synology NAS, making it accessible from the internet while maintaining greater control and customization. Remember to prioritize security by implementing proper firewall configurations, SSL/TLS certificates, and regular updates.
